
Ultimate Chocolate Cake

This baby is not only absolutely stunning, it's the perfect mix of crumbly chocolate cake, velvety chocolate filling and creamy buttercream frosting. Plus, it's topped with some of the most adorable and tasty, little, pastel, powdery eggs - who couldn't love this time of year!?
Sit this beauty atop your Easter table and your guests won't be disappointed - it ticks all the boxes for the perfect Easter treat. Plus, we get a nice long weekend - so there's plenty of time (and excuses!) to get through all the chocolatey layers with your friends and family.


Ultimate Chocolate Cake


Serves 12-14
Prep 1-2 hours, plus chilling & sitting time
Cook 25-30 mins
For the cakes:
1 lb (450g) self-raising flour
12 oz (340g) margarine
12 oz (340g) caster sugar
6 medium free-range eggs
3 ½ oz (100g) cocoa powder
For the chocolate buttercream filling:
3 ½ oz (100g) milk chocolate
7 oz (200g) unsalted butter, softened
10 oz (280g) icing sugar
1 tbsp cocoa powder
For the outer buttercream frosting:
1 lb (450g) icing sugar
7 oz (200g) unsalted butter, softened
dash Wilton Azure Blue icing colour
For the crushed mini egg topping: 3 ½ oz (100g) Cadbury mini eggs
What to do:
Start by pre-heating your oven to 160°C (325° F, Gas Mark 3) and grease three 8" round cake tins.
Cream the sugar and butter together with an electric whisk or wooden spoon until combined and fluffy.
In a separate bowl, beat the eggs. Then, with the electric whisk set on low (if using), carefully pour the eggs into the sugar and butter mix, a bit at a time, ensuring each dash is well combined before adding more egg. Continue until all egg is added.
Next, sift in the flour and cocoa powder in stages, gently folding into the mixture until combined, using a wooden spoon.


Spoon the mixture evenly into the three greased baking tins and roughly spread out to fill the base of each tin. Place in the middle of a pre-heated oven for 25 - 30 minutes, or until a knife inserted into the centre comes out clean.
Once out of the oven, leave in the tins for 10 minutes before transferring the cakes onto a wire cooling rack to cool completely.
~
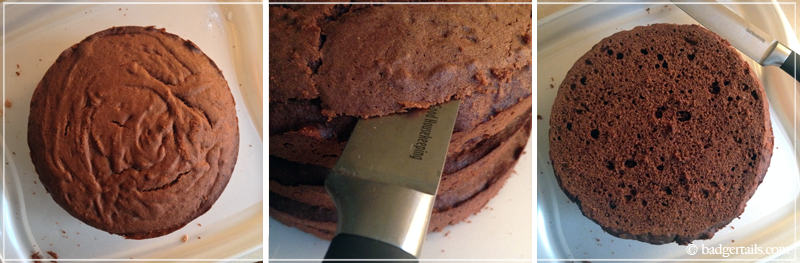
Once cooled, choose which cake will be best for the top layer, and carefully using a large knife, slice the top off this cake to square it off.

To make the chocolate frosting filling, melt 2 oz (50g) of the butter with all of the milk chocolate in a bain marie or the microwave.
Meanwhile, combine the icing sugar, remaining butter and cocoa powder with an electric whisk or wooden spoon.
To make the chocolate frosting filling, melt 2 oz (50g) of the butter with all of the milk chocolate in a bain marie or the microwave.
Meanwhile, combine the icing sugar, remaining butter and cocoa powder with an electric whisk or wooden spoon.
~
Add in the melted chocolate-butter mix and blend until it has a stiff but creamy consistency. If needed, add a dash more icing sugar to thicken up.
Next, spoon half of the filling mixture onto the bottom layer of cake and spread to the edges with a knife. Place the next layer of cake atop this and press down gently to fix. Repeat with the other half of the chocolate filling and evenly spread over the cake.


Lastly, tip your top layer (the one you previously sliced to make flat) upside down and place atop the other layers, and press gently to fix. This should then give you a lovely squared-off cake.
Wrap the cake in cling film and leave to stand in an airtight container for a few hours, or overnight if possible. This allows the chocolate filling to set slightly, which will make icing the outside of the cake a lot easier.
~
To make the buttercream frosting for the outside of the cake, combine the icing sugar with the softened butter the same way as before.
Before you add the colouring, use 2-3 tablespoons of the white buttercream mixture to create a crumb barrier, which will seal in any crumbs and stop them getting into your final coloured frosting.
To do this, spread the frosting over the entire cake with a palette knife, ensuring it is fairly smooth and even, then place the cake in the fridge for 30 minutes to set.

While this is chilling, add the dash of Wilton colour to the remaining frosting and blend. Remember, you can always add more colour but you can't take it away, so ensure you only add a tiny amount at a time! Stop when you get a light and airy shade of apple green.
Once the cooling time is up on the cake, remove from the fridge and coat with a thin layer of the green frosting, making it as even and as smooth as possible. Pop this back in the fridge and chill for a further 20 minutes.
Finally, remove from the fridge and use the rest of the frosting to coat the entire cake, smoothing with a palette knife as you go. Take care on the top edge - you may need to apply a little more here and smooth it over gently.

You can use a cake smoother if you wish to achieve flawless frosting, but I prefer the slightly less smooth and relaxed finish you get from a palette knife.
~
To finish the cake, place three different coloured mini eggs in the centre of the top of the cake, then crush the rest of them roughly in a pestle & mortar.
Carefully sprinkle these in a circle on top of the cake, leaving a small gap between this and the edge for best effect.
Complete the look by tying a delicate pink ribbon around the base of the cake and present on a simple cake stand for the ultimate wow factor!


Is it Easter yet!?
Have a fab week, friends!
Carefully sprinkle these in a circle on top of the cake, leaving a small gap between this and the edge for best effect.
Complete the look by tying a delicate pink ribbon around the base of the cake and present on a simple cake stand for the ultimate wow factor!


Have a fab week, friends!


0 comments
Thank you for stopping by!